Auto Presentation Switcher
User Guide Mac
Contents
0. Introduction
Auto Presentation Switcher (APS) helps you display presentations, images and videos on your computer. You can switch presentations seamlessly, display videos and images on top of your presentations, and display a screenshot when no presentation is displayed.
APS can be controlled from the user-interface, using global keyboard-shortcuts, or over the local network using Bitfocus Companion.
1. Compatibility
Mac requirements
Big Sur, Monterey, Ventura, Sonoma, Sequoia and Tahoe OS.
(11-15)
CPU architecture
APS works natively on both Apple silicon and Intel CPU-architecture. It should be compatible with all modern macs.
Programs and file extensions
PowerPoint:
PowerPoint 2016 is supported. Both 32 and 64 bit versions of PowerPoint can be used.
Programs and file-extensions
Keynote
.key
Powerpoint
.pptx, .pps, .ppttm and .ppsm. We recommend using .pptx if possible.
Skim PDF and Adobe Acrobat DC
.pdf files can open in either on these programs.
Still-images
Jpeg or PNG files
Presentation-software version compatibility
In general we recommend updating to the latest versions of these programs listed above. APS Mac may work with older versions of presentation-software, but performance can’t be guaranteed
2. Installation and licence
2.1 Installation
Download the application and run the installer. When the app starts for the first time it will enter trial-mode. In this mode the app will work normally for 10 minutes and then close. To use the app without restrictions, licenses must be installed.
2.2 Activating the licence on a new computer
After you buy a licence, this will be e-mailed to you. When you open APS, you will first see this menu:
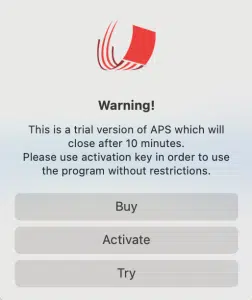
Push Activate. Now copy and paste the licence-code from your mail into the activation field and push “Activate”. The licence is now installed
! This process requires Internet-connection, and your computer must be able to contact our server which is placed on the domain www.presentationtools.com. Make sure that no firewall on your computer prevents the APS application from contacting our server.
2.3 Using the licence
The licence can only be activated on one computer at a time. The licence-key is stored in the user-data on your computer. This means that if you change the user, you will have to repeat the activation-process, or use another licence.
After you have activated the licence to your computer, you can use APS also while not connected to the Internet.
2.4 User-account on PresentationTools.com

If you have a yearly subscription for your licence, you can monitor and release your APS licences from our webpage. To do this you need a user-account using the same email-address registered to your licences. Accounts can be created from this page. You must verify your Email-address to complete the process. After the user has been created, you can go to the Dashboard-page and manage your licences from there.
To access your licences, push the “Keys” button for your subscription.
2.5 Switching the licence to a new computer
From the image above you can see that the APS licence is “In Use”. This means that this licence is now activated on a computer. To use the same licence on a different computer, you first need to deactivate the licence from your current computer. You can do this by pushing the Release button. The licence will now be free to use on a different computer. The old computer with the licence does not need to be online for this process to work.
The second way to release the licence is directly from the user-interface in the application. From the top menu-bar, go to Activation, then push the Release button. This process requires Internet connection.
! Note that uninstalling the application itself does not de-activate the licence, since this process does not involve our web-server. It is possible to have a licence registered to the computer also when APS is not installed on the machine.
To activate the licence on a new machine, repeat the steps from 2.3
2.6 Computer tag
If you tag the computer, this name will be shown in the user-dashboard under “Computer Name”. This can be a useful feature if you need better control of which computer(s) has the licence(s) installed.
3. Security and privacy settings
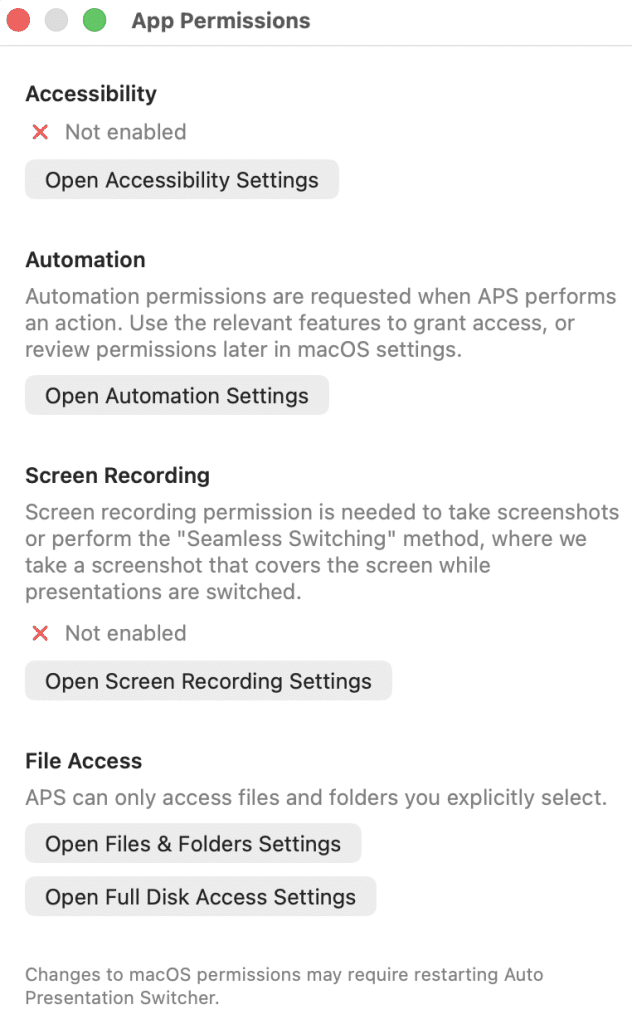
Auto Presentation Switcher needs specific macOS permissions to function properly and automate your presentations. To get an overview of your current permissions, and links to where you can set them, you can open the App Permissions window from the top menu bar. Here is an overview of what app permissions are needed for APS Mac to work properly:
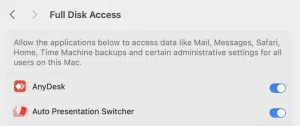
- Disc Access (Files & Folders or Full Disk Access)
The app monitors presentation folders to detect new or updated files and open them automatically. This requires direct access to the file system. - Accessibility
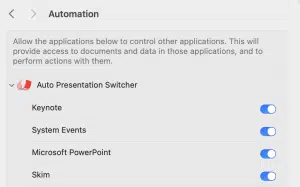
This permission allows the app to control presentation software (PowerPoint, Keynote, Skim, Adobe Acrobat Pro) by simulating user actions like advancing slides or opening files. - Automation
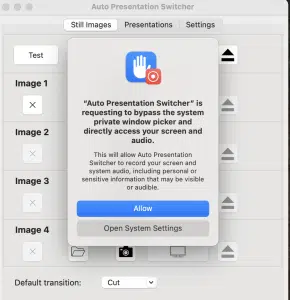
The app communicates with other applications to open and control presentations. macOS requires explicit permission for controlling PowerPoint, Keynote, Skim, Adobe Acrobat Pro, and System Events. - Screen & System Audio Recording
Auto Presentation Switcher can take screenshots and display them. This is used for the “Seamless Switching” method, and the “Capture” command in Companion.
3.1 Accessibility
When you open the program for the first time, this popup-window will appear:
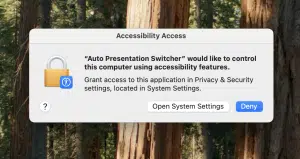
Push the button to open System Preferences.
Here you will need to do the following:
-Click the lock to make changes. Enter password- Push the + sign and add Auto Presentation Switcher from the file-menu
– If this is successful then you will be asked to re-open the program. This will be done automatically after you accept.
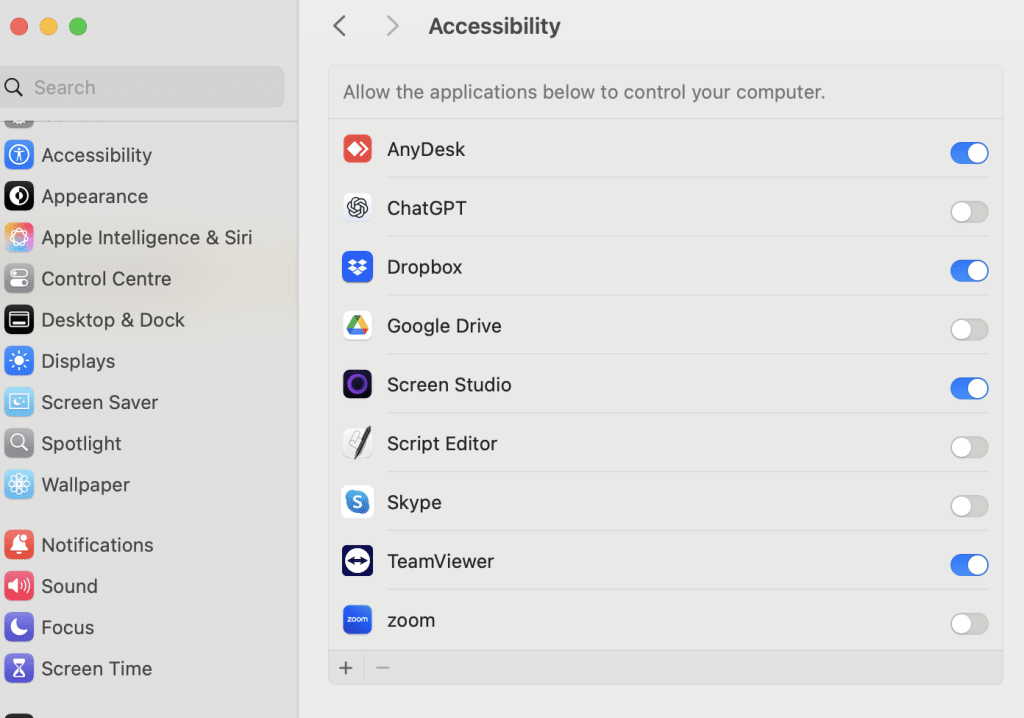
3.2 Automation
The first time APS opens a program for presentations, you will be prompted to allow automations. You will need to allow this for APS to control the presentation-programs.
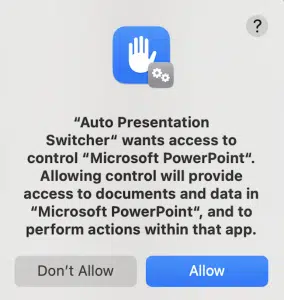
If you push “don’t allow”, you can always enable this permission later from the Privacy and Security settings:
3.3 Files and folders
Whenever APS tries to access a file in a new location, you will be prompted to
APS Mac wants to access files on your Mac.
You can also give APS permissions manually from the security & privacy menu. Choose which folders you want to use with APS, or simply give APS access to all with the option “Full Disc Access”:
3.4 Screen recording
The first time you take to take the screenshot, or try to switch presentations seamlessly, you will be prompted to allow screen recordings:
Go to System Settings to change these permissions, similarly to how you do with Accessibility. Note that you need to restart APS for these changes to take effect.
3.5 Updating APS and permission settings
! Important about updating: You might also need to set this permission again when upgrading from earlier versions. After every update, we recommend that you test basic features of the program. If you get problems with the presentation-commands after updating, try to manually set the permissions again, by deleting previous permissions for APS and choose the new version of the app.
We are sorry for the inconvenience.
4. Control presentations with keyboard shortcuts
Our keyboard-shortcuts for controlling presentations will work globally across your computer, and they will react to the window and app that is in window-focus. With PowerPoint and pdf in Fullscreen, the file is in “window-focus” when spacebar or right arrow advances to the next slide in that presentation. This means that if you accidentally mouse click on another program while the presentation is shown, these commands probably wont work. (but neither will the presentation-clicker)
The main method to control presentations with keyboard-shortcuts is with the commands command+rightarrow that will open the next presentation in the folder and put it in fullscreen. This way, you only need to sort your presentations alphabetically and numerically in the folder, and during the show, just push ctrl + rightarrow when you you need to advance to the next presentation.
In APS you can control PowerPoint and PDF-presentation using this method.
4.1 Prepare presentations
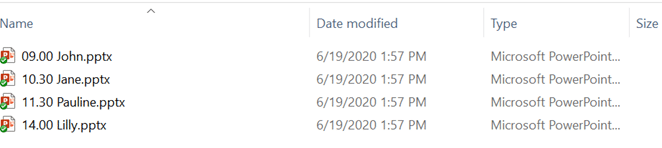
1. Put the presentations you want to display in one folder. Leave all other files outside this folder or put them in a sub-folder.
2. Rename the filenames of the presentations so that they are sorted alphabetically or numerically in the order they will be displayed.
Example:

Or you could use the time of the day:
You can verify that the order is correct by sorting the files alphabetically in File Explorer.
4.2 Switching between presentations
Using command + right and left arrow
Open a presentation and put it in full screen. When in full screen, use shortcut CTRL + right-arrow shortcut to go to the next PowerPoint or pdf-file in folder, and ctrl + left-arrow will mirror this action and go to the previous. The new file will open in Fullscreen
New in v.4.1: In Controlled mode, you can only switch between presentations in the folder that you choose as the watched folder. See the Settings section for more info.
Using command + down-arrow
Open a PowerPoint-presentation. Use command + down-arrow to open next PowerPoint or pdf-file without showing it in Fullscreen
4.3 Put files in Fullscreen with Command + up-arrow
When a PowerPoint-file is the active program but not in Fullscreen, the shortcut command + uparrow will put the presentation in slideshow-mode. (in this case the shortcut does the same as pushing the f5 button.) Note that the screen which the powerpoint is displayed is chosen from the Powerpoint internal settings, not from APS
When a pdf-file is the active program but not in Fullscreen, this shortcut will put the PDF in Fullscreen according to the display chosen in the APS «pdf-screen» option in the menu.
4.4 Close files with command + up-arrow
If PowerPoint or pdf-files are in Fullscreen and has window-focus, the shortcut command + up-arrow will change behavior: All currently opened documents that can be controlled from APS will close, except the one currently displayed.
With PDF, only documents in the currently chosen controlled program will close.
Please note this exception: When an Adobe Reader document is opened an in Fullscreen, ctrl + up-arrow will only close PowerPoint-files.
5. Still images
The still-images is a high-quality image-viewer that can display up to 10 different user-selected images and screenshots, along with internal “black” and “test” image. You can also take a screenshot and display it instantly, known as the “freeze” command.
5.1 Still-images menu
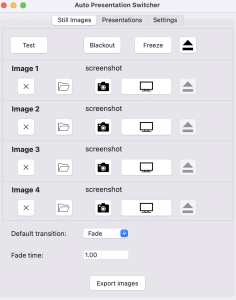
From here you can display images that are screenshots or files from the disk.
The images will always be captured and displayed in the Main Presenter Screen which can be set from the Settings menu.
Buttons are explained below

Display color bars

Display black screen

Take a screenshot of the Main Presenter Screen and display that as an image
Image 1-10
There are 10 user-configurable images that can be displayed. They can be set in 2 different ways:

Load image from file. This button also works with drag and drop.

Take a screenshot of the Main Presenter Screen and load this as the selected image
These two options above will override what was previously selected. To delete the selection press the X buttons.

Display the selected image. When displayed the button will lit red.

If an image is displayed, this button will eject the image.
5.2 Keyboard-shortcuts for still-images
These are global shortcuts that will work regardless of what is application is in window-focus.
Command + Shift + 1: Display image 1
Command + Shift + 3: Display image 2
Command + Shift + 3: Display test-image
Command + Shift + 4: Display black image
Command + Shift 7: Take screenshot and load this as image 1
Command + Shift + 8: Take screenshot and load this as image 2
Command + shift + f: Freeze the screen (Take screenshot and display this on the main presenter screen)
Command + shift + esc: Eject images
6. Media player

The Media player allows you to play up to 40 different videos, images or audio-files. The media will be displayed on the screen chosen from “Main presenter screen” in the settings.
6.1 Getting started
First, choose a media for the slot by pushing the folder-icon, or drag and drop a media-file onto the button.
Before a media can be played, it must be loaded. Load a media by pushing the load-icon. Then the next time you push the play-button, the media will play.
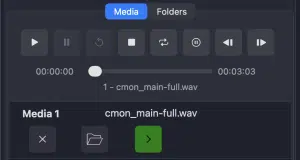
Video 1 is loaded and ready to play
By default, the media will play until the end. If you quickly need to exit the video or image, push the “stop” button. If the user-interface is covered by the video, you can first push on the video-window with the mouse, then push the “escape” button,
6.2 Playback buttons


The play-button will start the loaded media from the beginning.

Toggle pause/play on the currently playing video
Restart the playing video

Stop the playing video, or, if a video is loaded but no video is playing, remove the load so that no media is selected for playback.
Loop the video

Hold at end. The video will freeze at the last frame.

Loads the previous media in the list. For example, if video 3 is loaded, this button will load video 2 if a media exists there.

Loads the next media in the list, mirroring the previous button
6.3 Timeline

For video and audio file, the timeline will show the progress of the video, total duration and name of the vide. You can drag the cursor to a new playback-position.
6.4 Select and load media

The media player has 40 available slots for media selection. To select the media for the slot, push the folder-icon, or drag the file from Finder to the same button.
To start playback of the file, first “load”, or cue, the media by pushing the load button to the right, making the button green. Only one media can be loaded at the same time. The next time the “play” button is push, playback of the loaded file will start.
The X button will clear the media selection.
6.5 Options at the bottom of the menu
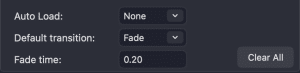
Auto-load
Select which video will load next after a video/media has started. “None” will select no media. “Repeat” will load the same media again. “Next” will load the next media in the list.
Default transition
Select how playback will start and end. With the fade-option you can fade the video in and out with the desktop-background. Note that you cant crossfade between videos, only fade in/out the vide-window.
The fade-time sets the duration of the fade when fade-mode is selected.
Clear all
This will clear all 40 media slots.
6.6 Using the Still-Images and media-player together
The still-images will always display on a layer below the media-player. This means that the media-player will always hide the still-images when a media is playing. The still-images can then act as a bottom layer with the media player. For example, you can use this to make the background black when no video is playing, or display a background company-logo.
7. Slot presentations and folders
7.1 Presentation slots
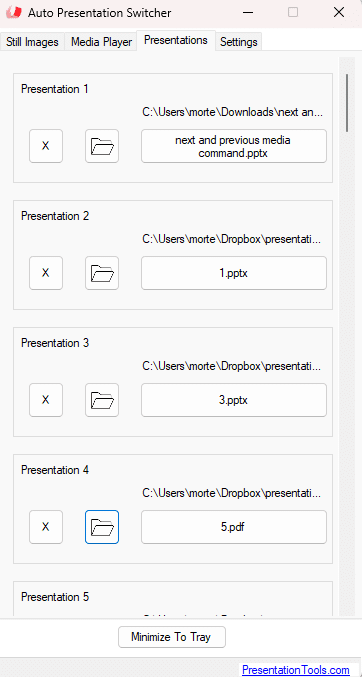
The slot-presentations lets you choose 40 presentations that you can open and display from the APS menu or through the network. (Companion). This menu has 3 buttons which are explained below:
Push this button to select the presentation for the slot. You can also drag the files to this button to select them.

Removes the selection
Displays the presentation in fullscreen. The button shows the filename of the presentation, and on the top you find the filepath.
7.2 Presentation folders
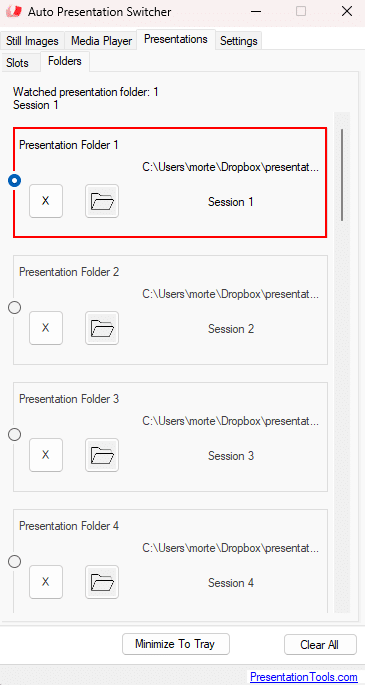
You can select a folder with presentations that you can monitor over the LAN-network through Companion. From the menu, choose up to 20 folders, and select one of them to be “watched”. This folder will be monitored in real-time, and changes to the presentation-files will be updated: if you delete a presentation in the folder, or do name-changes, APS will be notified.
The video below shows how you can use this feature in Companion: You can toggle between your presentation-folders and create a page that shows all the presentations from the watched folder. And you can start the presentations from the same buttons.
8. Settings
The last tab in the menu is for the general user-settings. The options are explained below, starting from top
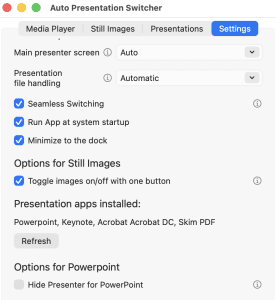
General options
Main Presenter Screen
This sets the screen when:
– displaying PDF-files using APS-methods
– displaying Still Images and screenshots
– capturing screenshots
The Auto setting automatically sets the extended screen as the main. In most cases people use the extended screen to display presentations, and then the auto-setting will work fine. If more than two screens are connected to your PC, it is better to choose this screen manually instead.
Presentation file handling
APS supports two ways of determining which presentation file is currently active. This method is used in the commands to switch to the next presentation in the folder, among other things.
Automatic (default)
APS asks the presentation app for the full file path of the current document. This works in most cases, but can fail with cloud-based files, shared folders, or files opened from unexpected locations. If the file path can’t be resolved, APS will show an error.
Controlled
APS uses the watched folder as the source of truth. It only asks the presentation app for the document name and matches it against the watched folder, relying on the watched folder’s known files and order to identify and control the active presentation. If the current file is not found in the watched folder, APS shows an error and stops. This mode provides more predictable behavior in live event setups.
Seamless switching
When seamless switching is on, switching from one presentation to another in fullscreen will look like a cut or fade-transition between two slides. APS will display a screenshot of the current slide before opening and displaying a new presentation.
Run app at system startup
APS will be automatically opened on system startup
Minimize to the dock
The app main-window will be easily available in the dock while the program is opened. If this setting is off, the app main window can be accessed from the top menu-bar.
Still Images
Toggle images on/off with one button
When activated the same button and command can be used to turn on and off the image.
Presentation apps installed
This shows a list of the currently installed presentation-apps that can be controlled by APS.
Options for PowerPoint
Hide presenter view
If this setting is on, Presenter view will not be used for APS commands with PowerPoint. Note that this overrides the PowerPoint settings for Presenter View.

Options for PDF
Controlled program
Here you will see which program will be used by APS to control PDF presentations. The options are Adobe Acrobat Pro and Skim PDF. If both programs are installed on your Mac, you can choose one of them.
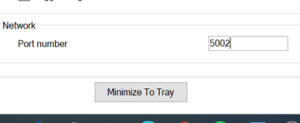
Network
Here you can set the port-number for where APS listens for TCP/IP commands. This can be used to remote-control APS with Companion.
Diagnostics – Export log
APS provides diagnostic tools to help troubleshoot issues. These tools contain technical information only and do not include presentation content or personal data.
Use Export log when requested by support.
Use Check app permissions to review which macOS permissions APS currently has, and to open the relevant system settings if something is missing.
9. Control with Companion
Companion is an open-source software that lets you control multiple devices through the local network. It is possible to connect a Stream Deck box with buttons for better hands-on operation, or you can use a web-browser. For more info and download-links, please go here: www.bitfocus.io
9.1 Companion compatibility
Companion v.3.5 has all the latest commands for APS 3.1, including commands for the new watched presentation folder. Earlier versions also work, but some of the features are missing.
9.2 Connect Companion and APS
Make sure that APS and the Companion software are on the same LAN-network.
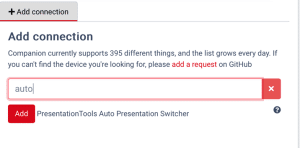
1. Open Companion and APS. (Which order doesn’t matter)
2. Go to Companion settings and add the APS module. The easiest is to use the search-field. If the module can’t be found it means that you need a newer version of Companion. Search for PresentationTools Auto Presentation Switcher.
3. IP-settings for APS
If APS is on the same computer as Companion, then you can use the Localhost address 127.0.0.1. If they are on separate machines you will need to find the IP-address of the Mac running CueTimer and plot this into the Target IP.
By default, APS uses port 4777 for communicating with Companion. Sometimes you might need to change this port number, in case 4777 is already used by another application. You can do this by changing the port both in Companion and APS. In Companion, change the target-port
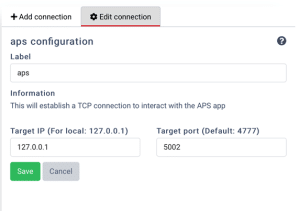
In the APS preferences menu, you can change the port-number to the same as the target-port in Companion
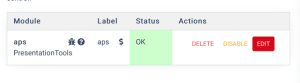
4. Check connection
If APS is open and connection between the apps then the status will be OK.
Troubleshooting: If status is not OK, or commands cannot be sent, you can check:
– LAN connection between CueTimer and Companion
– Firewall settings. The port used for communication must not be blocked, and both applications APS and Companion must be allowed to send and receive network messages.
9.3 Add buttons
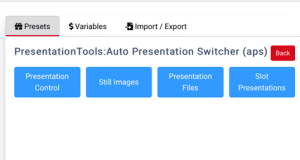
There are two ways to add commands in Companion. The easiest is to use the presets, then drag and drop the actions you need. Most of our commands can be found there.
You can also import the commands and customize through the regular button-menu
9.4 Use the commands
When everything is set up you can view the counter and execute all of the commands from the button-bar in CueTimer using the Companion web-emulator or a Stream Deck device.
9.5 Youtube tutorials
We are creating videos on Youtube where we go more in depth on our Companion module. Watch it from here:
10. Control Google Chrome
APS can open and control web pages and web apps directly in Google Chrome — right alongside your PowerPoint presentations. This is especially useful for the kinds of web-based tools commonly used during events, conferences, and meetings, such as Google Slides, Mentimeter, and Kahoot. Instead of manually switching between applications, APS lets you manage everything from one place through the same remote commands used for your other presentation sources.
APS uses Google Chrome specifically because it is one of the few browsers officially supported by Google for services like Google Slides — ensuring that presentations and other web apps display and function correctly. For Google Slides in particular, APS goes a step further by offering special slide control, allowing you to navigate between slides remotely — just like you would with PowerPoint.
Please note that some of the images in this chapter is taken from the PC version of APS, but the same principles apply to the Mac version.
10.1 Controlling Google Chrome through the developer port
To control Chrome remotely, APS launches a dedicated instance of the browser with a developer port enabled. This is a built-in feature of Google Chrome that allows an external application to communicate directly with the browser — opening pages, switching between tabs, refreshing content, going fullscreen, and more — all without requiring any browser extensions or manual interaction from the user. In short, the developer port gives APS a reliable, direct line of communication with Chrome, allowing web pages and web apps to be controlled just as seamlessly as PowerPoint or any other presentation source.
This dedicated Chrome instance runs on its own separate profile, so it starts with a clean slate — no saved logins, bookmarks, or history from your personal browser carry over. Anything stored during an APS session can also be cleared independently.
Important: All regular Google Chrome windows must be closed before APS opens its developer-port instance. If any Chrome windows are already open, APS will not be able to launch Chrome with the developer port, and a regular browser window will be opened instead — one that APS cannot control. Make sure to close all Chrome windows before using this feature. While the APS-controlled Chrome is running, we recommend using a different browser such as Microsoft Edge for any regular browsing, to avoid confusion with the developer-port window.
10.2 Control Google Chrome from the user-interface
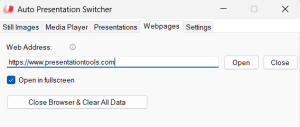
APS provides a Webpages tab in the main window where you can control Chrome directly.
To open a web page, type the URL into the address field and click Open. If the Open in fullscreen checkbox is ticked (it is by default), the page will automatically go fullscreen when it opens. To close the current page, click Close. You can also use Close Browser & Clear All Data to shut down the browser entirely and wipe any stored data such as cookies and login sessions.
You can also use the keyboard shortcut command + Up Arrow to put the active web page into fullscreen at any time.
The user interface and keyboard shortcuts are a convenient way to test that your web pages are loading correctly and to verify that APS can control Chrome as expected. However, in a production environment you would normally control web pages through network commands from Bitfocus Companion, which lets you build buttons for opening specific URLs, switching tabs, refreshing pages, and more — unlocking the full potential of APS’s Chrome control. This is covered in the next section.
10.3 Control webpages in APS from Bitfocus Companion
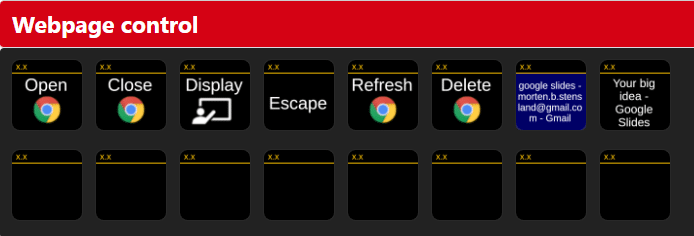
You can get most of the buttons you need for webpage-control from the presets in Companion, from the Webpage Control section. Here you can get similar commands as from the user-interface, along with more actions and feedback like changing tabs on the web-window.
10.4 Open web-pages

The “Open” button will open a URL in a similar way as the equivalent button in the UI, see 9.2 for more explanation.
10.5 Control web-tabs
You can control the web-tabs you have created with the “Webpage tab” buttons found in the presets. Note that the first time you find them in the presets, they will probably look empty, but by hovering over the buttons, you can see their names.
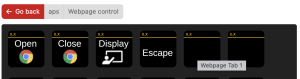
When you drag the buttons to a Companion page, then they will show the name of the webpage of the tab. For Google Slides and Slido presentations, these names will be the name of the presentation displayed. Note that the tabs will be sorted alphabetically, not in the order they are shown in the webpage.
The tab in blue is the currency selected tab. To change the currently selected tab, simply push the buttons.
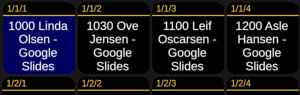
By default, Companion displays the webpage title on each button — the same text you see in the browser tab. This makes it easier to recognize content like a Google Slides presentation or a Slido poll during a live show.
However, if you prefer, you can choose to display the webpage URL instead.
🏷️ Webpage Title (Default)
The title is usually the name of the presentation or the content on the page.
✅ Easy to read
✅ Quickly shows what each tab contains
❗ May vary depending on the website
🌐 Webpage URL (Optional)
This is the actual link to the page (e.g. slides.google.com/…).
✅ More precise
✅ Useful for advanced setups or similar titles
❗ Harder to scan at a glance
10.6 Move the webpage window
The “Display” command will put the webpage in fullscreen on the external display, or the display you select as the “Main presenter screen” in the settings.
And to mirror this, the “Escape” command will put the web-window back to the main display.
Note that these commands are the same that are used for the presentations. They will react on the app that is in keyboard-focus: If you are controlling a PowerPoint presentation, they can put PowerPoint in fullscreen. So to use the “Display” and “Escape” commands to control the web-window, you first need to make sure that the web-window is the top application.
10.7 Multitask between PowerPoint and a webpage
To make sure that Google Chrome and PowerPoint are in window-focus, you can use the new buttons for application-control. This way, you can first select which application you want to control, and then use the “Fullscreen” and “Escape” buttons shown earlier. Or you can put a Chrome window and PowerPoint presentation in fullscreen on top of each other, and then use the application-buttons to switch what is shown to the audience. (see video)
If you haven’t already displayed the Chrome window in fullscreen behind the PowerPoint, you can use the “Display” command to move the window to the external display and then stack it on top of PowerPoint. By enabling “Seamless transitions” from the settings, the transition between PowerPoint and the Chrome window will be seamless.
10.8 Control Google Slides
APS will detect that a Google slides presentation is displayed and act accordingly. There are no extra commands for Google Slides.
Fullscreen presentation
Through APS you can put Google Slides presentation in and out of fullscreen automatically: whenever APS detects that a Google Slides presentation is in edit-mode, then every command to take the presentation to fullscreen will take the presentation out of edit-mode (if necessary) and show the presentation in slideshow-mode. Likewise, if you exit a fullscreen presentation on the main presenter screen configured in the settings, then the presentation will go back to edit-mode.
The Tab-commands will also take Google Slides in and out of fullscreen automatically. This means that you can switch between Google Slides presentations, or go between Google Slides and a regular webpage, and APS will ensure that after the command is executed, the new presentation or webpage will stay on the correct display in fullscreen.
Slide info for Google Slides
While a Google Slides presentation is displayed, APS will read slide-info from the webpage, and send current slide-number and total number of slides over the network-connection for listening devices like Bitfocus Companion. In Companion, this slide-info will be found with the variables
$(aps:slide_number)
$(aps:slides_count)
These variables are the same that is used for the other presentation-apps including PowerPoint and can be found in the Companion presets. This means that you can have the same Companion buttons showing slide-info regardless of which presentation-program you are working with.
You can also use the generic commands “go to slide number” to go to a specific slide while Google Slides is in slideshow-mode.
10.9 End the session and delete browsing data – How to stay compliant
When you control the Google Chrome web-window through APS, you use a custom APS user-profile. This means that the browsing-data used for this session is detached from your main Google Chrome profile. The first time you use this web-window, you will need to log in again, but it’s possible to keep the login if you close and re-open the window.
By keeping a separate profile, you can protect your private browsing-data from the web-content you display to an audience through the APS google chrome webpage.
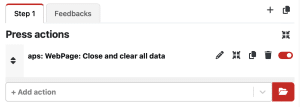
After the job is done, it’s a good idea to delete all data from the custom profile. This ensures that none of the login-info or browsing-history will be kept for the next job. You can do this with the APS command “Close and clear all data”.
11. APS api
You can also control APS over the network without Companion. Through our open API you can build applications that can interact with APS in different ways. Or you can control it directly from applications like Vmix.
The API is free for anyone to use.
Link to the public APS API
12. More info
We also put some instructional-videos on our Youtube-channel
Contact: